RV Engine Cover Remake
OK, that is one boring title for sure! But I didn’t want to mislead anyone, this is simply a project report, no more, no less. This isn’t about traveling, it’s about taking care of our “travel tools”, in this case Howie, our motorhome.
What’s the big deal? Well, a lot of class-A gasoline motorhomes come with a big access cover that goes over the engine. You have to remove it for any serious engine work, and even a lot of simple stuff. No big deal. But what IS a big deal is that so many manufacturers chose to finish the outside of “the doghouse” with carpet.
[NOTE: If you are uninterested in such topics, you can un-check the “Projects” box in your email preferences, and you won’t get notifications for these types of posts.]
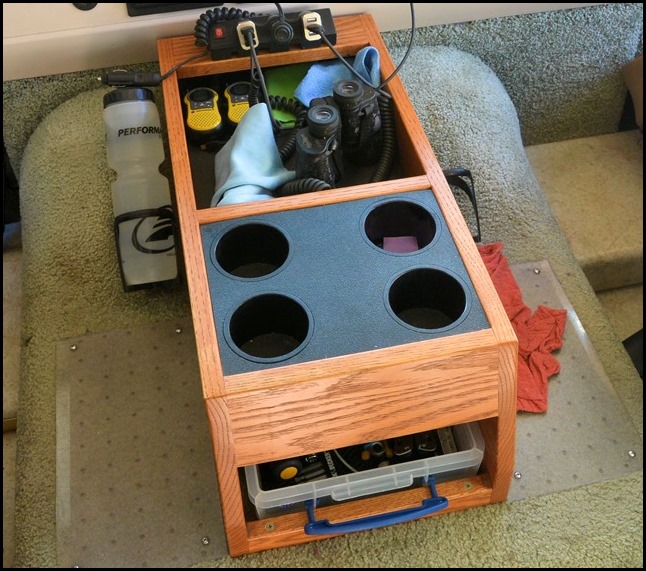 Over the years, the carpet in an RV deteriorates. It fades, comes loose, deposits little crumbly pieces of dried adhesive and yarn tufts all over the place – – and that’s not to mention getting absolutely filthy. The big hump is full of compound curves and very difficult to clean. At 14 years of age, it was time for Howie to get a little make-over. And I wanted to get to it before things got really ugly.
In the photo, the relatively-new oak console still looks great — but the hump covering is clearly aging.
I had pondered endlessly how to re-finish the cover, and the only thing I knew for sure is that it WASN’T going to be carpet. With a lot of half-baked ideas in my head, I launched into the project.
CARPET REMOVAL
I had been dreading this, and it actually was the major reason for NOT starting the project for the last few years. But I took the plunge.
First, I tried adhesive removal chemicals. Goof-Off and a water-soluble one from Ace. The first few square inches made me abandon that. I knew I’d never get the surface clean enough for good adhesion to a polymer compound.
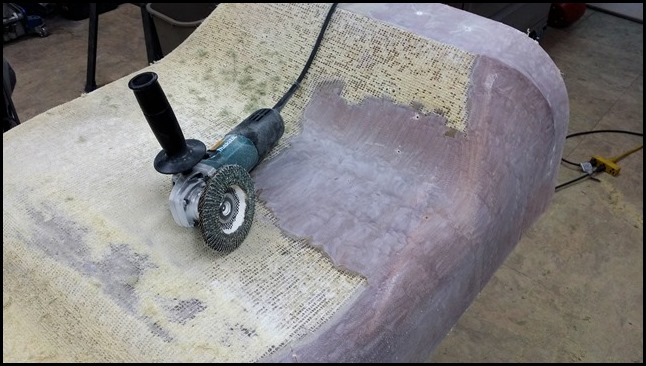
Next, I started physically yanking the carpet off. This worked a little — but left a thick, crumbly layer of old adhesive that need a hammer and chisel to remove it. On a hunch, I put a flap-sander disk on my disk grinder and tried a section. Huzzah!! It came right off. Took a little fiberglass gel off with it (hmmm), but the hump was really thick, like 1/4″-3/8″, so there was enough material to let me grind some away.
In the photo, the cross-hatch stuff is the old carpet backing. There’s a lot of shallow scuffing on the hump, but never deep enough to hit the fiberglass base.
I was concentrating so hard on getting the crud off, and not digging too deep into the fiberglass, that I didn’t notice right away what an incredible mess I was making in my workshop. It was a rainy day, with the doors shut, and the disk grinder was throwing old adhesive EVERYWHERE.
When I finally looked up, my whole shop was coated in a pale-yellow dusting of ancient mummified carpet goo. I blew it out and swept it out – – so now it’s just a vaguely dusty museum-looking shop. I have no idea how I’m going to get everything clean again. Might have to move.
NEW COVERING MATERIAL
I studied all kinds of possibilities, but the compound curves of the big hump tended to rule out any approach using sheet materials. Eventually, I settled on a re-covering strategy using a pickup-truck bed coating material. Turns out there are at least six or seven providers, not counting the cheapo rattle-can products that are neither thick enough nor heavy-duty enough to qualify. For the selection process, I had (only) three mandatory requirements:
- Heavy Duty — the cover gets a lot of inadvertent kicking. It has to be stood on for front-cabinet access, and it has to be shuffled out of place and back into place for engine service. All of this mandates a tough, resilient coating like the hardier brands of pickup-bed coat.
- Color (not black) — Black just wasn’t going to cut it with our beige/green/oak decor. I needed something either tintable, or with an appropriate native color. This immediately ruled out some of the top brands like Rhinoliner and Herculiner.
- Thick, rough coating — Removal of the carpet required grinding off old hardened adhesive, leaving a rough and dinged surface. In addition, the original fiberglass hump was far from smooth, with the factory carpeting covering a multitude of sins. And when in use, the cover gets a lot of foot traffic and inadvertent kicking. I needed a coating thick enough to hide lots of imperfections.
After ruling out black, too-thin, and too-smooth products, I ended up choosing between U-Pol, T-Rex, and Durabak. U-Pol got the nod, and I bought a full setup (coating, curing agent, tint) and ran a test patch. Aw, rats. The color was just wrong. Texture and toughness were outstanding, but I just couldn’t find a right color, even after working with a local auto-paint specialist.
SOUND REDUCTION
In addition to the outside of the hump, I wanted to do something to cut down on engine noise. I didn’t know exactly what to do, or how to do it, so some extensive Internet research was in order.
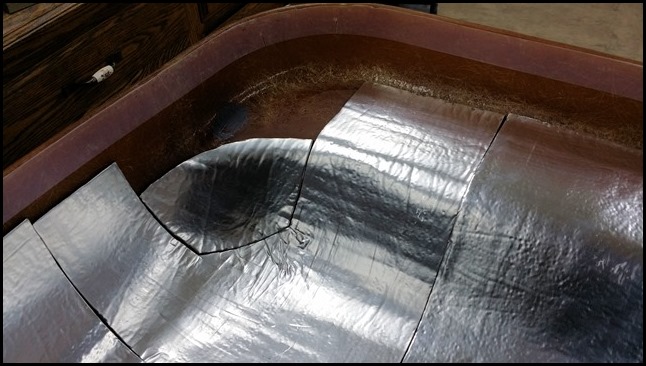
It turns out that several vendors provide stick-on products for the purpose of reducing noise in vehicles. Reviews said the less-expensive ones were made from asphalt and had long-lasting residual odors. That would be a big problem in our living space, so I selected a butyl-adhesive brand called GTMAT.
I was very concerned about putting the GTMAT “upside down” on the underside of the hump. It’s normally put on floorboards and side panels, more rarely on the bottoms of panels. So I tested the adhesion by using a small roller and really leaning into the GTMAT on a clean area of fiberglass. It seemed to have good grip, and hopefully will retain its position over time and temperature.
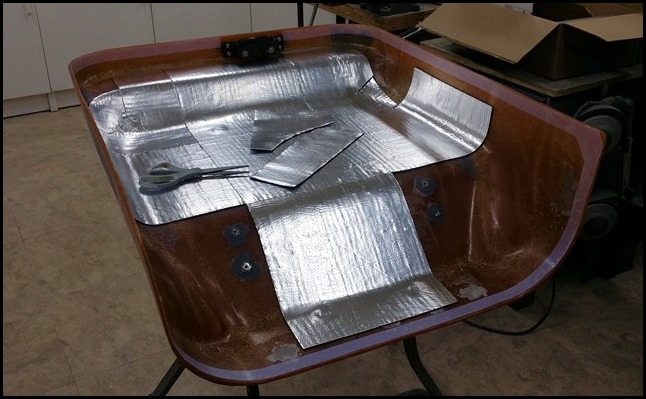
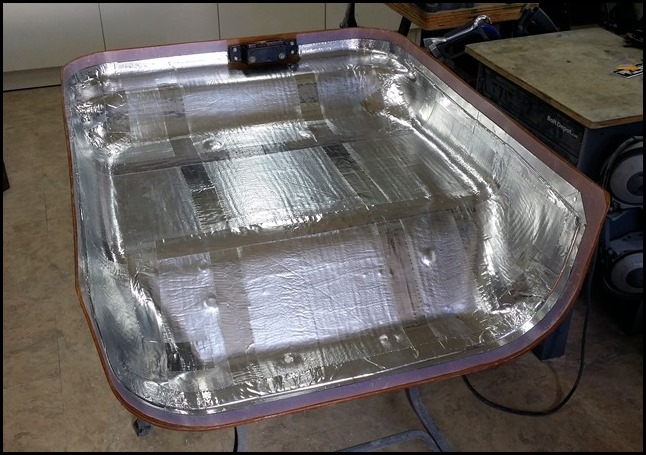
This particular brand comes in foot-square sheets, so I just covered the easy areas first and rolled it on really well. And before everything was covered up, I epoxied in some stainless steel threaded inserts for stuff that has to mount to the top of the cover.
The compound-curved areas were a lot more difficult, and these small areas took three times longer than the easy large flat areas. It was also much more difficult to roll the curves for good adhesion of the butyl adhesive.
While the hump was still upside-down, I lined the gasket-sealing area with teflon tape. Then, when all the GTMAT was in place, I sealed all the seams between the sheets with aluminum-foil butyl tape.
Ready for the top-side treatment – – –
TOP COATING
After the U-Pol “color failure”, I ordered a quart of Durabak in “Olive”, and eagerly awaited its arrival. After ten days, my friendly UPS guy finally left it on my doorstep, and I ran a test patch. The good news: a terrific color match, easy cure, great adhesion. The less-good news: quite a bit rougher finish than the U-Pol – – – but usable. Kind of like a stair tread non-slip coating.
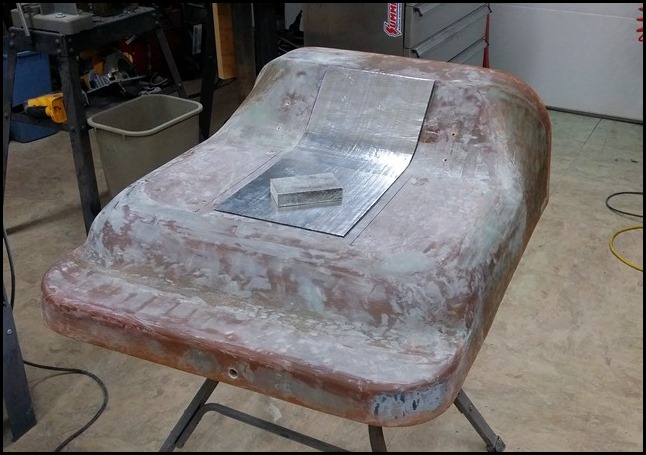
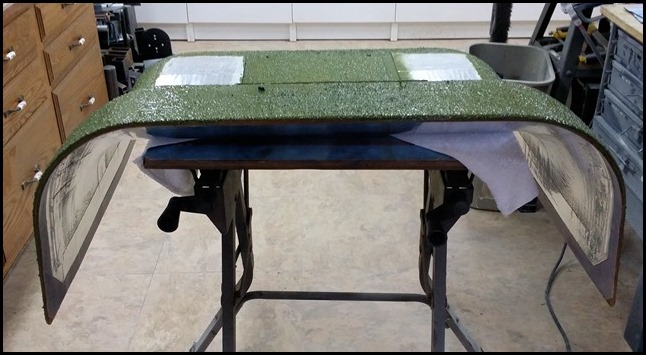
At this point, I also made the decision to add more sound deadening to the top surface, just to help along with the noise-reduction goal. But the GTMAT is soft, and can’t be used for standing or rough treatment, even with the bed coating over it. The patch in the photo fits underneath the center console that attaches to the hump.
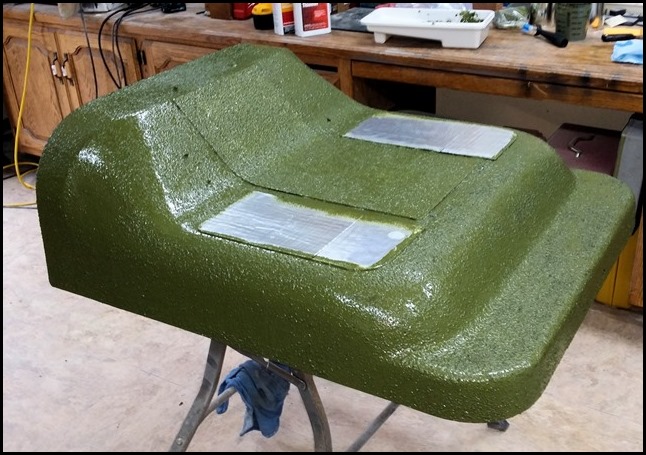
Two more patches of GTMAT (these will go underneath the aluminium diamond-tread step-plates), and then the first coat of Durabak Olive. I had been a little concerned about scratches and dings showing through, but no way — this coating is really rough, and will conceal a multitude of surface sins.
I tried a regular sheep-wool roller, but it caused clumping of the rubber particles in the coating. Eventually, I ended up using a special roller called a “stipple” roller, which is intended to leave a lumpy/bumpy finish. It worked perfectly.
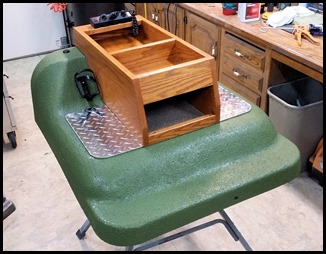
Final coating shows the rough texture of the Durabak.
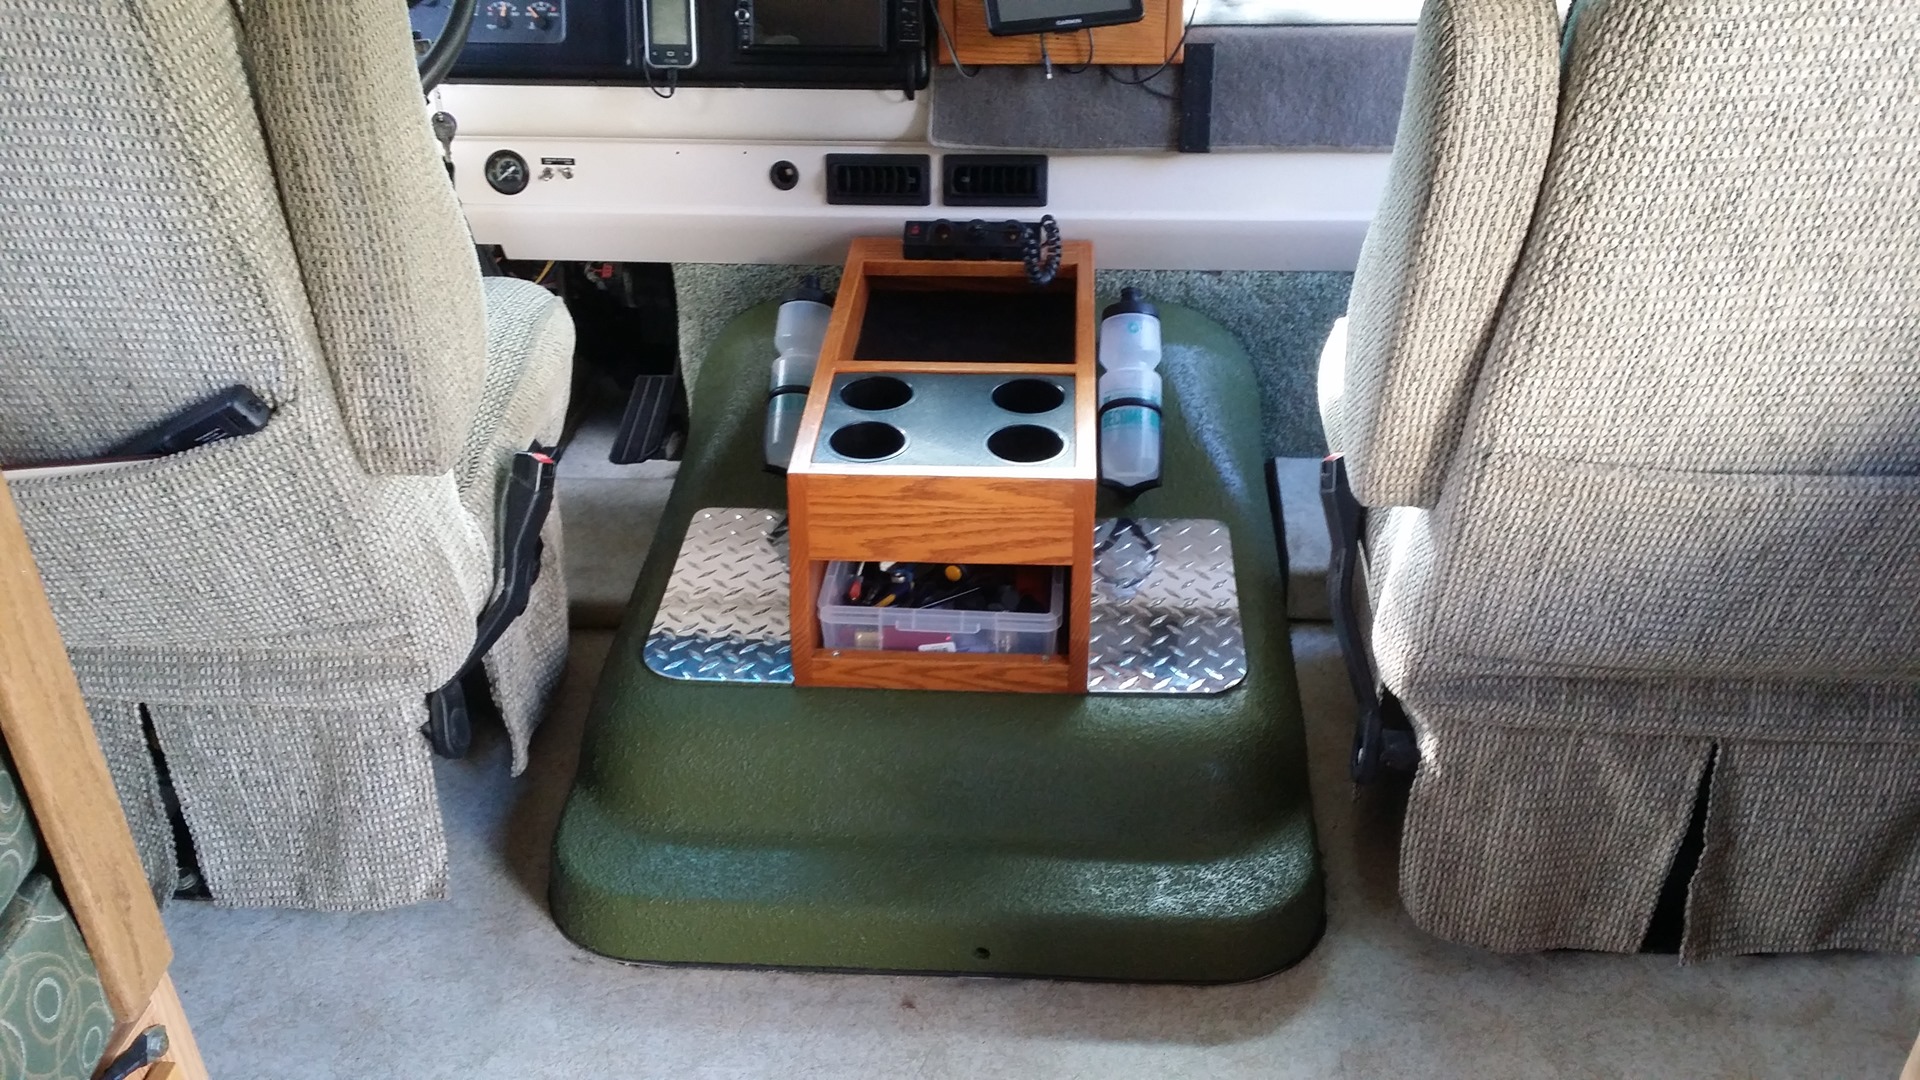
After two days of cure, I fitted the water bottle holders, center console, and step plates. I also added some Southco twist-and-pull catches to replace the crappy sheet metal that originally was assembled to the cover.
All ready for re-installing into Howie. He’s going to be so happy.
Well, it was indeed a ton of work, just as I thought it would be. But fortunately (this time), I had plenty of time, and didn’t have to work on it if I didn’t feel like it. That’s the best way to work a project, for sure.
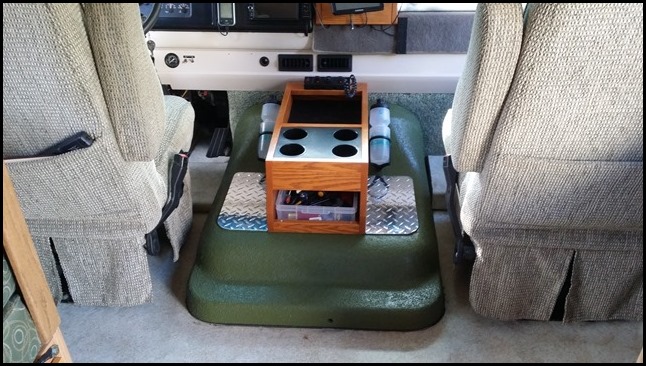
Re-installed in Howie, the color-match and overall appearance are really gratifying. I had to play around a bit with the latch adjustments, but eventually got everything snugged up just perfectly. There will now be no chance whatsoever of any air or noise leaking past the cover seal.
Lots and lots of work, and well worth it in the end.
Nice job, Greg. I just wanted to find out how your doghouse came out. Mine looks similar to yours, and FEELS like it oughta pop right out, but I can only get loose on 3 corners(left rear is being obstinate), and the front seems to hang up after I lift it couple of inches. No visible fasteners. My cover has a hole in the rear like your, but there doesn’t seem to be anything in there. Hopefully your still monitoring this Net, I could use a little help. Thanks
Ken,
the cover is held by three points: two small sheet-metal tabs at the front, and one pivoting catch at the center-rear.
The rear catch is obnoxious at best, and takes considerable study and “tweaking” to work properly. It is driven by a special 3/8 Allen key, with a long reach (about 2″+), and takes 180-degrees to fully engage/disengage. A regular Allen won’t work well — if you don’t have one, see if you can find it, part number 116833-01-02B.
The front “catches” are simply metal tabs that project forward, and engage (sort of) with the upper arch of the firewall. These tabs can easily get bent and out of whack.
Be SURE your rear catch is disengaged. If you can lift the rear edge of the hump straight up, you’re good. Otherwise, you have to fiddle with it, sometimes (seemingly) endlessly.
Once the rear comes up, drag the hump backwards few inches, and the front tabs will be out of play. Then you can lift the whole hump up.
CAVEAT: try not to slide the hump. The bottom seal is easily damaged ($40 from Winnebago).
If you get the hump properly installed, with a good (new?) seal, you WILL be rewarded with a fairly quiet ride.
My upgrade is still working well, and none of the sound-deadening is coming loose. Pretty good mod.
I LOVE YOUR IDEA. I AM CONSIDERING THE SOUND REDUCTION PROCESS. ONE THING I AM CONCERNED ABOUT IS THE AMOUNT OF HIGHER HEAT BUILD UP WITH THIS NEW DESIGN. HAS THAT BEEN A CONCERN FOR YOU?
Linda,
If you’re talking about ENGINE heat buildup — I haven’t measured it, but I suspect it’s not consequential. The engine is not in a “compartment” of any kind, it’s bathed in free air flow. Therefore, any heat loss from the engine into the passenger compartment is negligible as far as the engine is concerned. But it’s great to reduce engine heat effects in the cabin. And in fact, the passenger compartment is just a tiny bit cooler, the engine hump is not quite so warm, as before. Water, oil, and transmission temperatures are unchanged.
G.
Drew Finally found a site that explains the process and well done. As you are into rv’s I have a dilemma that you may know about. I want to remove my carpet and replace it with a vinyl plank floor. Not a good idea as the manufacturers state that the warrantee is nil if installed in a rv. The reason is that with the drastic temp change the vinyl plank will separate and gaps appear. I though about glue down however they state that there will still be movement. I really do not want to go back to carpet however I can see no other choice. Any ideas
Tom,
We went through that (agonizing) process ourselves a few years back. My brother-in-law did install “plank” style flooring, AND he glued it down, AND it separated at the seams due to thermal and vibration influence.
Our solution was different: we opted for sheet vinyl, and had a professional lay it down in the RV. It wasn’t cheap, but it’s a bullet-proof floor with no seams except at the edges (which are caulked). No dirt in the cracks, and for sure none of the gawdawful problems with carpet.
Call around the flooring places in your area, and shop Home Depot or Lowe’s or whoever stocks sheet vinyl. Ours was an Armstrong product; there are many, many others. As with all jobs, floor preparation is the key, and your installer should understand this. The RV floor is usually a combination of wood and metal, and can require extra care in leveling and smoothing.
We are REALLY happy with our setup.
We are going to use a product called Cortec Pro Plus. If you get a chance–check this out for your RV. We live in Indiana and our Motorhome sits outside year round.
Greg:
After a season of use, please comment to us on the quality of sound reduction you got from your modification. Thanks.
Robb
Robb,
thanks for the attention and interest. I’m traveling in Howie as I write this, and I have two things identified for noise reduction.
First, the engine cover is holding up well. There is no detachment of the stick-on sound matting (which concerned me). Furthermore, the sound reduction is noticeable, but not earth-shaking. In technical terms, I would say it’s probably no better that a 6-10db reduction. Nice, but not exciting.
Second, after some use of the modified engine cover, I installed a Banks Power system. I was VERY concerned about the added noise from the headers, and in fact it was the OPPOSITE. The Banks system actually reduced the noise further, perhaps even more than the engine cover soundproofing.
At this point, we can actually have a conversation on the highway without straining, and if we speak a bit more loudly we can even talk on a hill climb. This is a wonderful overall improvement.
Bottom line, I think the engine hump soundproofing is worth the trouble and cost, but don’t expect too much. Oh, it also slightly cuts the heat too.
G.
Hi Greg,
I really like the project you completed. I was curious if you purchased that oak console, or if you made it. If you purchased it, where did you get it from? We are looking at adding a console to our Class A and can’t seem to find much out there.
Thanks
Steven
Hey Steven,
Thanks for the compliments. For a while, I had access to a guy who was a gifted cabinet maker, and out of work. He did piece-projects for me, including three outstanding additions to Howie. The console is one, there’s another knick-knack tray on the dinette table, and a miscellaneous rack up on the dashboard.
Sadly, he’s gone about other business, and all the recent oak-work has been my own (and much less artful).
That said, if I had it to do over again, I could produce something as sturdy and useful, albeit not quite so pretty. I mocked up all of them using cardboard and duct tape, until I had what I wanted — then it was built from white oak and stained to match.
Thanks for our ’93 Fleeetwood 28′ Class A on a P-chassis 454 cui gas. 36,000 miles. All original.
“Coronado”
Timely INFO!
Thanks for your EXPERT efforts and for this NEWSLETTER!
Our ’93 Fleeetwood, 28′ Class A on a GM P-chassis – 38,000 miles and a 354 gas!
All original…but the carpet over tghe Engine Cover is beginning to un-ravel!
Thanks for your great info – happy camping…dwayne simon Azle, TX
Interesting that you have a Howie, our 2002 HR Endeavor 40DST is also named Howie, got his name in 02 when we started fulltiming. He now has 155,000 miles. In our case Howie stands for House on Wheels Includes Everything. I enjoyed your article. Nice thin king outside the box on your part.
Hey Walt,
Ha! our HOWIE stands for House On Wheels In Excess. We were looking for 23-25 feet in a class-C, not a nearly 28-foot class-A. But my wife liked the walkaround bed so much, and I liked the big sweeping view up front so much, that we bought “him” anyway — despite the “Excess”.
How well was the noise reduction ? Did it make much difference? I like the final look.
Yeah, we like the looks too. So many things going on, we haven’t tried it out on the road yet.
I will update the post when I get some experience. Other reviewers say it’s been a good mod, so we’ll see.
I used the gtmat with great success in sound deadening.After installing the banks system my engine got quite loud.I actually put five layers on and also dis the firewall and floor.worked great.
Tom,
I thought about the Banks, but every vehicle I’ve ever done headers to was MUCH louder, so I’ve avoided it (for now).
Like you, I’m doing more soundproofing (GTMAT and spray-on undercoat) wherever I can get at. Fingers crossed.
As for extra layers, I’m a bit uncertain about adhesion, and I didn’t want the extra weight pulling the stuff downward until I got some mileage on it. Have you had any un-sticking problems?
Greg,I installed the gtmat on a warm day first laying it out in the sun.I bought two rolls of their 80 mil and no issues of it coming loose,nor have I noticed any odor.This is my third banks system love the power and less shifting with the trans command.I tow a 3200 lbs car.I was getting a lot of noise from their air cleaner system but putting the gtmat on the firewall help some.Buy the way I have not noticed any fuel mileage increase but love the power on my v 10.I had to be carefull when I added extra layers to engine cover not to get to close to motor or other components..
Tom
Tom,
I’m running the 8.1L Workhorse — great engine, poor transmission (not enough gears). Put in a Gear Vendors over/underdrive a while back, so now I have six gears if I want to fiddle with the switch a lot. I use it mostly towing in hills at high elevation. I’m pulling 4000 pounds (Ralph). What I hear is that the Banks is useful mostly for high revs, not low-end. And those 500 cubic inches don’t like to spin — like 4000rpm max sustained, and that is NOISY indeed. Plus it’s going to get noisier with the headers, so I’m still on the fence. I hear that if you heat-wrap the headers, they quiet down. Not sure.
Just wondering what latches you used to hold it in place and where you purchased them. I’m also interested in the Teflon tape reference. I did not quite understand that part. Overall I’m more interested in the sound deadening aspect, so I’ll be curious to see if you notice a difference. Good job, and thank you for posting.
Dave,
I used the Southco E3-15-15 twist/pull series. They make a zillion versions of these, so you have to know exactly what grip-range you can tolerate. The latching pawl reverses, so each latch has two grip ranges. The pull of those latches is about 1/4″. The exact same series is used on the hood of my Itasca Sunova 2003, so the latch key is the same — that was a motivating factor.
Over time, I found that the rubber gasket, around the periphery of the engine opening, would tend to stick/tear on the inner surface of the hump fiberglass. I had some teflon chafe tape left over from my aircraft-mechanic days, so that’s what I used. There are probably other choices. The one I have “in stock” costs $45 at Aircraft Spruce (!), so it might not be worth your trouble.
This is an interesting project. I am curious about how you installed the step plates over the GTMAT. Were they bolted, glued or?
Pete
Hey Pete,
I thought about screwing-down the step plates, but – – – they don’t get a lot of side-stress, and they are 1/8″ thick and won’t bend or wear out. So I figured I’d likely never need to remove or replace them. I just used polyurethane adhesive sealant to glue to the top of the GTMAT. No muss, no fuss.
G.
Great job, Greg! You’ll enjoy it for many years to come, I’m sure, so it was (and will be) well worth the effort! And if other RVers want to do the same thing, you’ve saved them a lot of headaches and time. 😀 –Diane
Very nice work- I hope you and your wife rewarded yourself. Really nice craftsmanship on your part.
Thanks,
Drew
Hey Drew,
thanks for the praise — we were both very pleased with how it turned out. Couple more things to do and then we’ll take off for a while and enjoy “the fruits of our labors”.
G.